
What Is a Booklet Cover on KDP?
Your 24-page interior file—its typography for self-published books settings for fonts and sizes already locked in—is already sitting in your KDP dashboard, proofed and locked in, and the paperback setup page is now asking for one more thing: a cover. That single file, the booklet cover, has to wrap the front, spine and back of your book into one flat sheet, sized to exact measurements KDP checks before it accepts anything. Miss one of those measurements and the file bounces back to you no matter how good the artwork looks.
A booklet cover is the file that wraps the front, spine and back of a short, low-page-count paperback into one printable sheet. On KDP that's true whether you're publishing a 24-page coloring book, a 40-page journal or a slim novella: the interior file and the cover file are separate uploads, but the cover itself is never three separate images. It's one PDF, laid out flat, that gets folded and glued around the printed pages. Booklet covers show up most often on low-content books, and for the wider platform they sit inside, see our guide to Amazon KDP. Outside KDP, the same phrase sometimes means the folded, stapled cover of a church program or zine, a different print job this guide doesn't get into.
The Three Panels, One File
Design the back cover, the spine and the front cover as three sections of a single flat canvas, not three documents. The front cover is what most people mean when they say "the cover": the artwork and title shown on the product page and the top of the printed book. The back cover carries your book blurb, price and reserved barcode area. The spine sits between them, and on very short booklets it might be too narrow to hold anything at all. More on that shortly.
Types of Booklet and Book Covers You Could Design
Before you touch trim sizes or bleed, it helps to know which kind of cover your project actually needs. Not every KDP book uses the same construction, and the choice affects what you build and how the spine behaves once it's printed.
- Paperback wraparound cover: the standard KDP paperback build: front, spine and back on one flat sheet, glued around perfect-bound pages. Almost every low-content book, journal or novella on KDP uses this format.
- Hardcover cover: a similar wraparound layout, printed on stiffer board stock and wrapped in a printed or laminated case. KDP treats hardcover as its own format with its own dimensions and its own cover build.
- Dust jacket: a loose paper wrap that slides over a hardcover case, printed with its own front, spine, back and inside flaps. It sits on top of the case cover as a separate printed layer.
- Saddle-stitched booklet cover: a folded cover stapled through the spine fold, typical of pamphlets, zines and short programs printed outside KDP's paperback pipeline. Its spine has no printable width. Just a fold.
- E-book cover: front panel only, with no spine or back cover to design, since a digital file has no physical thickness to wrap around. Many KDP authors build this as a simple crop of the paperback's front panel.
Where to Get a Booklet Cover: Free, Premade or Custom
Once you know which type of cover you need, the next decision is who builds it. Four realistic routes exist for a KDP booklet cover, and each trades cost against how much control you keep over the final file. Marketplaces selling premade book covers let you browse finished artwork by genre and buy the rights outright, which is worth knowing before you commit to a custom brief.
| Option | Cost | Turnaround | Best for | Limitation |
|---|---|---|---|---|
| Building the cover directly in your KDP dashboard | Free | Minutes to a couple of hours | Low-content publishers making many similar titles | What's on offer depends on whatever design option your account currently shows; check your dashboard when you set up the book |
| Free design software, template-based | Free | A few hours | Authors comfortable dragging and dropping who still need KDP's exact dimensions plugged in | You calculate trim, bleed and spine width yourself and import them as a custom canvas size |
| Premade cover marketplace | A flat fee, usually below a custom commission | Same day to a few days, since the artwork already exists | Authors who want a professional look fast, without waiting on original art | The design isn't exclusive to you; another author could buy the same cover |
| Custom-designed cover | A negotiated fee, higher than premade | Days to a few weeks, depending on revisions | Authors who want an original cover matched to a series or brand | The highest cost and longest lead time of the four options |
Whichever route you choose, the file that comes back still has to land on an exact trim size, bleed and spine width (the KDP cover size calculator turns your trim and page count into the full cover dimensions), or KDP hands it back regardless of how good the artwork looks. That's the arithmetic the rest of this guide walks through.
The KDP Spine Width Formula (And When Your Booklet Gets None)
KDP works out your booklet's spine width from two things you control: how many pages the interior has, and which paper stock you picked for it. White paper, cream paper and premium color paper each print at a different thickness per page, so two books with the same page count can come back with two different spine widths depending on which paper you chose. KDP runs those numbers through its own formula and hands you back an exact spine measurement matched to that specific book.
Calculating Spine Width by Paper Type
A fixed multiplier printed in a blog post can go stale the moment KDP updates its printing specs, so treat any number from outside your dashboard as a rough guide at best. When you set up your paperback's cover inside KDP, the process asks for your trim size, your final page count and your paper type, then returns the spine width for that exact combination. Enter your final, proofed page count and your chosen paper, white, cream or premium color, and use the figure it gives you. Don't carry over a number from an older project. A different page count or a different paper choice changes the result.
More pages generally means a wider spine. Denser paper stock, like premium color, tends to run thicker than standard white or cream, which pushes the width up further at the same page count. A 24-page coloring book on white paper will always return a much narrower spine than a 300-page novel on cream paper, even though both are valid KDP paperbacks. Paper type and page count also drive your printing cost per copy, which is explained in full under print-on-demand economics.
Why Some Booklets Print With No Spine Text
Every low-content publisher runs into this at some point. Once a booklet gets thin enough, the spine width KDP calculates for it drops below what's needed to hold readable text, and the platform leaves the spine blank. KDP doesn't publish one fixed page-count cutoff that applies across every paper type and trim size combination. The only reliable way to know where your book falls is to check the spine figure your cover setup returns once your final page count and paper choice are locked in. If it comes back blank, or close to it, skip spine text altogether. Designing something that won't survive printing wastes your time.
Working Through the Numbers for a 24-Page Coloring Booklet
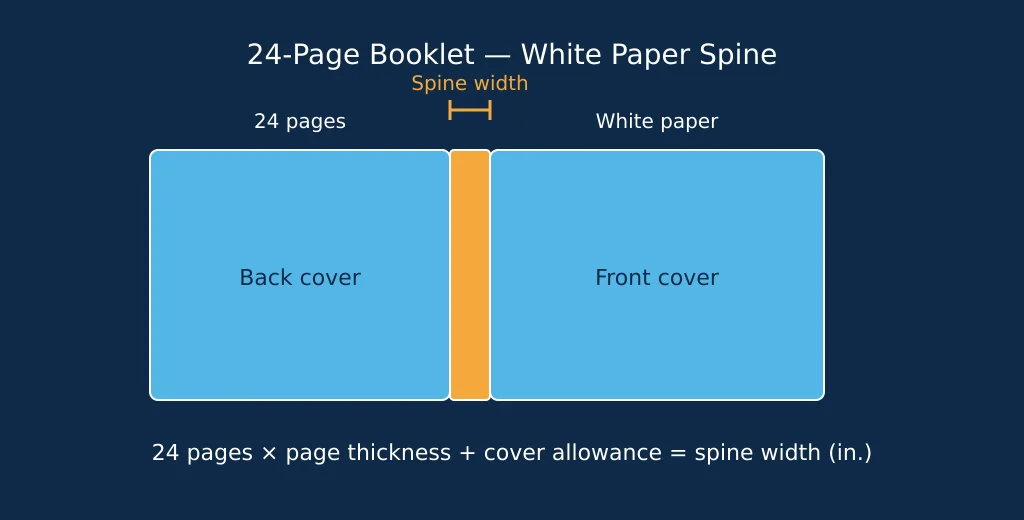
Say you're publishing a 24-page coloring booklet on white paper, a common shape for KDP low-content titles. KDP takes that page count, multiplies it by the thickness of a single white page, and adds a small allowance for the cover material itself; the total is your spine width in inches. Twenty-four pages is short enough that the multiplication often lands well under a printable line of text. That's why so many short coloring and activity books ship with no spine text at all; a squeezed, illegible attempt would only look worse. Enter your own page count and paper type into your book's cover setup to see the actual figure it returns, and don't be alarmed if it comes back tiny. That's expected for a booklet this short, not a sign you've done something wrong. If your project does return a printable width, keep spine text short and centered. Even a legitimate width at this length is often only a fraction of an inch.
Setting Trim Size and Bleed So KDP Accepts Your File
Trim size and bleed are the two measurements KDP checks a cover file against before it even looks at your artwork. Get these wrong and the file bounces regardless of design quality.
- Pick a trim size that suits your booklet's content. Common choices for journals, coloring and activity books include 6 x 9, 8.5 x 11, 8.5 x 8.5 and 5 x 8 inches, though the exact list your account can choose from lives in KDP's trim size dropdown when you set up the paperback.
- Confirm your interior file already uses that same trim size. A cover built for one size and an interior built for another is one of the most common causes of a rejected upload.
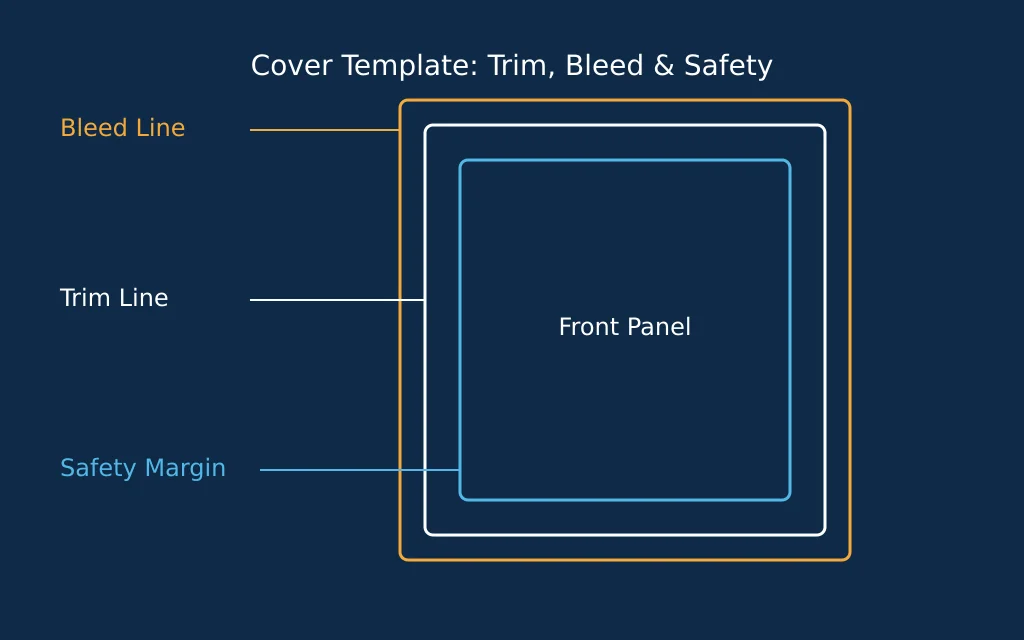
- Add bleed to every panel that touches the edge of the page: front, back and spine. Bleed exists because the printer trims each copy after printing, and artwork that stops exactly at the trim line risks a thin white sliver if the cut lands a hair off. Extend background color or art past the trim edge by the exact bleed measurement your book's template shows; that figure is generated for your specific trim size, not fixed across every KDP book.
- Keep text and important artwork inside the safety margin, the buffer between your trim line and anything you don't want lost to a cut or a fold. KDP marks this line directly on the template it generates for your book.
- Leave the reserved barcode area on the back cover empty. KDP stamps a barcode into that space automatically, or you can generate a free ISBN barcode yourself and place it there. Either way, no cover art or text belongs underneath it.
- Some low-content publishers add a QR code linking to a bonus download or their author page. If you want one, BookBird's QR code generator produces one you can drop into the same reserved space, as long as it doesn't overlap the barcode itself.
Building the Cover File Step by Step
With your trim size, bleed and spine width settled, the rest is assembly. This is where the numbers above turn into an actual file KDP will accept.
- Download the cover template your dashboard generates for your exact trim size and final page count, once your interior file is uploaded and its page count is locked in. It reflects your exact page count and paper choice, which is more reliable than building from a generic size chart.
- Open the template in your design tool and build front cover, spine and back cover inside its guides, all on one canvas.
- Cover art and title go on the front panel, inside the safety margin. Spine text stays short and centered, if your page count is high enough to carry any spine text at all.
- Blurb, author bio or pricing copy go on the back panel, built around the reserved barcode area you left blank earlier. If you're building a journal or planner and still need a matching interior, our KDP interior templates give you a ready-made starting point.
- Flatten the file to a single layer. Export it in the file type and color mode your cover upload page currently specifies; a cover saved in the wrong color space is a frequent cause of rejection.
- Upload the finished file through your book's paperback setup page and use the built-in 3D preview to check the whole wraparound before approving it. Look at the spine specifically. It's the panel most likely to shift if your page count changes later.
Common Booklet Cover Rejections (And the Fix)
Most rejected covers come down to a handful of repeat mistakes. Here's what to check first if KDP bounces your file.
- A file that isn't flattened, with layers or embedded objects still live, can fail on KDP's end. Flatten to one image or one PDF layer before you export.
- Missing or insufficient bleed leaves a thin white sliver at the trim edge once the book is cut. Rebuild the background to extend past the trim line using your template's bleed guide.
- Spine text placed on a booklet thin enough to have little or no printable spine width gets squeezed, cut off, or the file gets rejected outright. Check your calculated spine width before you add any spine text.
- Images pulled from a phone screen or a website often fall well below the print resolution a cover upload needs, and they come out visibly blurry once printed at book size. Source or export your art specifically for print; a web-sized file rarely holds up at book size.
- A cover built in the wrong color mode can shift colors unpredictably once printed, since printers and screens don't read color the same way. Check what your cover upload page currently asks for and convert your file to match before exporting.
- Design elements or text sitting over the reserved barcode area force KDP to reject the file or stamp the barcode straight over your art. Leave that corner empty until the barcode, or a QR code, goes in.
Before You Hit Upload: Your Cover Checklist
Run through this list immediately before you submit the file. Once it clears KDP's check, your next decision is pricing your booklet.
- Trim size on the cover file matches the interior file exactly, panel for panel.
- Spine width recalculated against your final, proofed page count. Page counts often shift after a last edit, so check it again before export.
- Bleed and safety margins present and correct on all three panels: front, spine, back.
- Fonts embedded and the file flattened into a single layer, with no live text boxes left behind.
- Barcode area left clear on the back cover, with nothing covering it.
- Trim size confirmed one more time against your KDP dashboard listing for this book.
Booklet Cover FAQ
What is the cover for a book called?
The cover. More precisely, it's made up of the front cover, the spine and the back cover, all part of one wraparound file on a printed paperback.
Where can I buy premade book covers?
Marketplaces built around premade book covers let you browse finished designs by genre, buy the rights, and add your own title and spine text before uploading to KDP. Expect to pay a flat fee, get the file quickly since the artwork already exists, and know upfront that the design isn't exclusive to you.
How to get a book cover for free?
Two free routes exist: building it directly inside your KDP dashboard, or using a free design tool where you build the canvas yourself at KDP's exact dimensions. Both cost nothing but time, and both still need your trim size, bleed and spine width entered correctly.
What are the different types of book covers?
Paperback wraparound, hardcover, dust jacket, saddle-stitched booklet and e-book front-only covers are the five you're likely to meet as a KDP publisher, though the e-book behind that front cover still has to be uploaded in one of the accepted electronic book file formats. Which one applies depends on your book's binding and format, not just its genre.